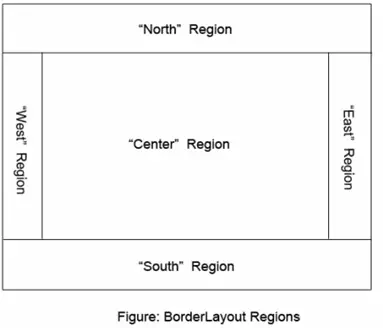
BorderLayout Manager Example: After knowing the layout managers, FlowLayout and GridLayout functionality, let us go to the style of BorderLayout arrangement of components in a container. As the name indicates the container is divided into 5 regions – 4 borders (North, South, East, West) and 1 Center.

Following are the properties of BorderLayout manager.
- Components are added at borders and center. The position should be specified while adding the component like North or East etc.; else the default is Center.
- When added, say south or north, the component occupies complete width of the container and when added, say east or west, the component occupies complete height of the container. Center occupies complete remaining space.
- When it occupies complete width or height, another component cannot be added to the same side and if added, it is not an error, but overrides the earlier; that is, earlier goes out and the latest comes.
- Using BorderLayout, we can add maximum 5 components only to a container; 4 at the borders and one at the center.
- The default gap between the components, either horizontally or vertically, is 0 pixels which can be changed explicitly.
- It is the default layout manager for Frame, Dialog, FileDialog, Window and Container.
- It is best suitable for adding scroll bars.
Following program on BorderLayout Manager Example illustrates the addition of components to frame.
import java.awt.BorderLayout;
import java.awt.Frame;
import java.awt.Button;
import java.awt.Color;

public class BLDemo extends Frame
{
  public BLDemo()
  {                                    // set the layout
    setLayout(new BorderLayout());
    setBackground(Color.red);
                                       // create the components
    Button btn1 = new Button("Himalayas");
    Button btn2 = new Button("Indian Ocean");
    Button btn3 = new Button("Bay of Bengal");
    Button btn4 = new Button("Arabian Sea");
    Button btn5 = new Button("India");
              // place the components, position should be specified
    add(btn1, "North");
    add(btn2, "South");
    add(btn3, "East");
    add(btn4, "West");
    add(btn5, "Center");
                                       // frame creation methods
    setTitle("Learning BorderLayout");
    setSize(350, 300);
    setVisible(true);
  }
  public static void main(String args[])
  {                                   // just call constructor to execute the whole code
    new BLDemo();
  }
}
BorderLayout Manager Example
setLayout(new BorderLayout());
setBackground(Color.red);
The layout to the frame is set to BorderLayout and infact even without this statement also program works because the default layout manager for the Frame is BorderLayout. The background color, red, is not seen as the default gap between the components is 0 pixels.
Setting gaps between the components
The default 0 pixel gap can be changed by setting the gaps explicitly.
setLayout(new BorderLayout(20, 40));
20 indicates horizontal gap and 40 indicates the vertical gap. Horizontal gap means the gap between the components within a row. Vertical gap means the gap between the components of two rows. Now the background color red is seen.
What happens when a component is not added?
When a component is not added, the neighboring components occupy the space and at no time the space is left empty. In the above program, miss one or two add() statements and observe how the remaining components behave. This understanding is very essential in layout management.
But if the center does not exist and all the remaining exist, the center space will be left empty and not occupied by the remaining.
The positions, used above, are in string form and can be replaced by BorderLayout static constants as follows..
- BorderLayout.NORTH in place of "North"
- BorderLayout.SOUTH in place of "South"
- BorderLayout.EAST in place of "East"
- BorderLayout.WEST in place of "West"
- BorderLayout.CENTER in place of "Center"
This type of addition is used in "AWT Choice".
Knowledge of Panels is also essential with layout managers to get the desired layout of components.
The frame you get do not close when clicked over the close icon on the title bar of the frame. It requires extra code close icon to work.