Java AWT Panels play a very important role in layout management. Panels in combination with layout managers render the desired layout to the programmer.
Following hierarchy gives the place of Panel in AWT API.
java.lang.Object –> java.awt.Component –> java.awt.Container –> java.awt.Panel –> java.applet.Applet
Properties of Java AWT Panels
- As you can see from the hierarchy, a panel is both a component and a container as it is a subclass of both Component and Container. As a component it can be added to another container and as a container it can be added with components. Panels work both ways.
- The default layout manager for panel is FlowLayout which can be changed as per the requirement of the layout.
- It is known as a child window. As a child window, it does not have a border.
- Panels can be nested (known as nested panels) for better layout presentation.
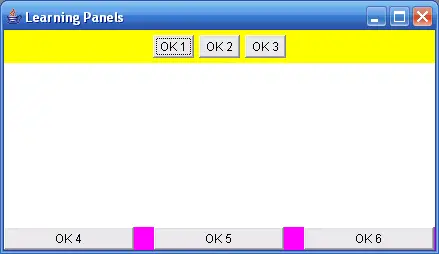
Following program illustrates the panels' usage in layout management. In the following program, three buttons are added to the north (top) of the frame and three buttons to the south (bottom) of the frame. Without panels, this arrangement is not possible with mere layout managers.
Example on Java AWT Panels
import java.awt.*;
public class PanelsDemo extends Frame
{
    public PanelsDemo()
    {
       setLayout(new BorderLayout());
                                                 // creating panels
       Panel p1 = new Panel();
       Panel p2 = new Panel();
                                         // setting some properties
       p1.setBackground(Color.yellow);
       p2.setBackground(Color.magenta);
       p2.setLayout(new GridLayout(1, 3, 20, 0));
                                          // create some components, say 6
       Button b1 = new Button("OK 1");
       Button b2 = new Button("OK 2");
       Button b3 = new Button("OK 3");
       Button b4 = new Button("OK 4");
       Button b5 = new Button("OK 5");
       Button b6 = new Button("OK 6");
                                       // add 3 buttons to Panel p1
       p1.add(b1);
       p1.add(b2);
       p1.add(b3);
                                        // add 3 buttons to Panel p2
       p2.add(b4);
       p2.add(b5);
       p2.add(b6);
                                         // add panels to frame
       add(p1, "North");
       add(p2, "South");

       setTitle("Learning Panels");
       setSize(300, 300);
       setVisible(true);
     }
     public static void main(String args[])
     {
       new PanelsDemo();
     }
}

Output screen of Java AWT Panels
Panel p1 = new Panel();
Panel p2 = new Panel();
Two panels, p1 and p2 are created and set background colors to know the space occupied by them.
p2.setLayout(new GridLayout(1, 3, 20, 0));
The default layout manager for a panel is FlowLayout. The panel p1 default layout manager is not disturbed. But for practice sake, the layout of p2 is changed to GridLayout with 1 row, 3 columns, 20 horizontal gap and 0 vertical gap (as only one row exist).
p1.add(b1); p1.add(b2); p1.add(b3);
Three buttons b1, b2 and b3 are added to the panel p1. Similarly, buttons b4, b5 and b6 are added to panel p2.
add(p1, “North”);
add(p2, “South”);
Panel p1 is added to the north of the frame and p2 is added to the south. Along with panel p1, three buttons go and stay on the frame on north-side. But on the account of frame only one component p1 exists. Like this, panels can be added to the east and west of the frame also.
Note: For simplicity, the window closing code is not included. For closing this frame, 4 styles exist and you can apply any one to this program to close the frame.
To get it to work in Netbeans
39 public static void main(String args[])
40 {
41 PanelsDemo panelsDemo = new PanelsDemo();
42 }
thank you very muchhhhhhhhhhhhhhh
Very good explanation.
We want this type of simple program
This is somewhat good for knowledge of Panel..
So, Keep it up.